文:宋瑞文
本站聲明:網站內容來源環境資訊中心https://e-info.org.tw/,如有侵權,請聯繫我們,我們將及時處理
【其他文章推薦】
※帶您來了解什麼是 USB CONNECTOR ?
※自行創業 缺乏曝光? 下一步"網站設計"幫您第一時間規劃公司的門面形象
※如何讓商品強力曝光呢? 網頁設計公司幫您建置最吸引人的網站,提高曝光率!!
※綠能、環保無空污,成為電動車最新代名詞,目前市場使用率逐漸普及化
※廣告預算用在刀口上,網站設計公司幫您達到更多曝光效益
北部有線電視-提供穩定的寬頻光纖上網、高畫質HD數位頻道、第四台電視、數位電視,現在申辦免費體驗3個月"HD99高畫質套餐"
文:宋瑞文
本站聲明:網站內容來源環境資訊中心https://e-info.org.tw/,如有侵權,請聯繫我們,我們將及時處理
【其他文章推薦】
※帶您來了解什麼是 USB CONNECTOR ?
※自行創業 缺乏曝光? 下一步"網站設計"幫您第一時間規劃公司的門面形象
※如何讓商品強力曝光呢? 網頁設計公司幫您建置最吸引人的網站,提高曝光率!!
※綠能、環保無空污,成為電動車最新代名詞,目前市場使用率逐漸普及化
※廣告預算用在刀口上,網站設計公司幫您達到更多曝光效益
摘錄自2020年1月31日中央社報導
巴西東南部米納斯吉拉斯、聖埃斯皮里圖和里約熱內盧三州本月遭暴雨侵襲,巴西總統波索納洛今(30日)視察受災最嚴重的城市之一好景市,宣布聯邦政府將撥款巴西幣9億元賑災。
1889年建城的好景市層獲聯合國評為「環境模範市」,同時被譽為「花園城」,1980年代市內綠地範圍和居民人口比例一度高達32平方公尺比1,但現在卻到處都是不透水的柏油路面,暴雨襲擊不僅引發嚴重淹水,道路更慘遭摧毀,出現坑洞、隆起現象。
聖保羅大學(USP)氣象學家安布里茲(Tercio Ambrizzi)指出,今年夏天南大西洋海水變暖,使得南極上來的冷氣團在巴西東南部停留更長時間,加上熱帶低壓帶來強烈雨勢,特別是米納斯吉拉斯、聖埃斯皮里圖和里約熱內盧三州持續多雨,土壤和岩層沒有足夠時間吸收水分,也容易引發土石流。
24日迄今,包括好景市在內,米納斯吉拉斯州已有101個城市處於緊急狀態,另外五個城市宣布進入公共災難狀態,超過5萬人流離失所,55人死亡。
本站聲明:網站內容來源環境資訊中心https://e-info.org.tw/,如有侵權,請聯繫我們,我們將及時處理
【其他文章推薦】
※為什麼 USB CONNECTOR 是電子產業重要的元件?
※網頁設計一頭霧水??該從何著手呢? 找到專業技術的網頁設計公司,幫您輕鬆架站!
※想要讓你的商品成為最夯、最多人討論的話題?網頁設計公司讓你強力曝光
※想知道最厲害的台北網頁設計公司推薦、台中網頁設計公司推薦專業設計師”嚨底家”!!
環境資訊中心綜合外電;姜唯 編譯;林大利 審校
本站聲明:網站內容來源環境資訊中心https://e-info.org.tw/,如有侵權,請聯繫我們,我們將及時處理
【其他文章推薦】
※USB CONNECTOR掌控什麼技術要點? 帶您認識其相關發展及效能
※評比前十大台北網頁設計、台北網站設計公司知名案例作品心得分享
※智慧手機時代的來臨,RWD網頁設計已成為網頁設計推薦首選
※評比南投搬家公司費用收費行情懶人包大公開
摘錄自2020年1月31日Yahoo新聞報導
澳洲森林大火逼近首都坎培拉,坎培拉今天(31日)宣布進入緊急狀態,這是近20年來的首次。
有40萬人口的坎培拉宣布進入緊急狀態,主要是考量天氣預報近日將有熱浪來襲,預測森林大火可能延燒到坎培拉南部郊區。澳洲首都特區首席部長巴爾(Andrew Barr)警告:「情勢可能演變到無法控制的地步…進入緊急狀態,是我們能對首都特區民眾發布的最強烈警示,民眾必須為自己和家人做好準備。」
南澳州(South Australia) 昨天氣溫達攝氏40度以上,氣象單位對州內數處容易發生大火的地區發布危險大火警示,並預測今天稍晚熱浪將襲擊墨爾本與坎培拉,而雪梨部分地區週末氣溫將達攝氏45度高溫。
當局表示,灼熱高溫伴隨乾燥熱風,將為新南威爾斯州(New South Wales)與維多利亞州(Victoria)部分地區創造嚴重森林大火的良好條件,而這兩州目前還有80多處有大火在延燒。
本站聲明:網站內容來源環境資訊中心https://e-info.org.tw/,如有侵權,請聯繫我們,我們將及時處理
【其他文章推薦】
※台北網頁設計公司這麼多,該如何挑選?? 網頁設計報價省錢懶人包"嚨底家"
※網頁設計公司推薦更多不同的設計風格,搶佔消費者視覺第一線
※想知道購買電動車哪裡補助最多?台中電動車補助資訊懶人包彙整
※南投搬家費用,距離,噸數怎麼算?達人教你簡易估價知識!
提到屬性描述符 [[Get]] 和 [[Put]] 以及提到了訪問描述符 [[Prototype]],看它們的特性就會很容易的讓人想到經典的面向對象風格體系中對類操作要做的事情,但帶一些 introspector 的味道。回想到之前所寫來自用的辣雞應用中所附帶了一個簡易的類似 jQuery 的簡易常用功能實現,就用到了簡單的 [[Prototype]] 特性。但我們前幾篇都沒有詳細的提及 js 的原型鏈相關的內容,本篇就將討論 js 的 [[Prototype]] 屬性和相關的內容。
注:ES6 的 Proxy 和 class 的概念不在本篇討論範圍內。
[[Prototype]]JavaScript 中的特殊對象屬性除了 [[Get]] 和 [[Put]] 外,還有一個很重要的特殊內置屬性就是 [[Prototype]] 了。
[[Prototype]] 是一個幾乎所有對象在創建時都會被賦予一個非空值的屬性,還記得在之前提到 new 操作符的行為嗎?其中的行為之一就是把其 [[Prototype]] 關聯指向到對應的內置對象上。通常 [[Prototype]] 所指向的即為創建此對象時所使用的對象了。
來看下面一個例子
var macat = { a: 1 };

var codingcat = macat; // 和 macat 指向的內容相同
codingcat.b = 2;
console.log(macat.b); // 2

var pineapple = Object.create( macat ); // 新對象,但其 [[Prototype]] 鏈向 macat
pineapple.c = 3; // 新對象的屬性
console.log(macat.c); // undefined
codingcat.d = 4;
console.log(pineapple.d) // 4;
上例中, 變量 codingcat 顯然是指向和 macat 相同的內容,實質完全一致,而 pineapple 則是通過 創建的變量。顯然 pineapple 和 macat 是不同的兩個對象。不過我們會發現我們依然可以通過 pineapple.d 訪問 macat.d 的值,這就是因為在 Object.create() 中,會把 pineapple 的 [[Prototype]] 指向我們的原型對象 macat 了。
那 [[Prototype]] 引用的作用是什麼呢?看上去這是一個確定這種像 fallback 一樣的取值操作應該 fallback 到誰的屬性標記,而準確的說,這種 pineapple.d 形式的屬性引用會觸發 [[Get]] 操作(上篇的內容),而默認的 [[Get]] 則會在對象本身沒有此屬性時會去查找 [[Prototype]] 引用的變量了。這樣的引用成為了鏈狀,故被稱作原型鏈。
當然,這個行為其實我們已經“用過”很多次了,比如 .toString()、 .valueOf()、hasOwnProperty(),我們 Object.create() 等形式構建的新對象顯然並沒有附帶一份這些函數的副本,而是因為普通的 [[Prototype]] 鏈最終都會指向內置的 Object.prototype,而它提供了這些功能。
不過上例中有個有趣的坑,我們考慮在上例的基礎上做如下操作:
...
pineapple.a++; // 交互式終端會輸出 1
console.log(pineapple.a); // 2
console.log(macat.a); // 1
pineapple.a++ 看上去是進行了變量自增的操作,但這一行后,我們發現 pineapple.a 不再等於 macat.a 了,這是因為實際上 pineapple.a 本來並不存在,但可以通過原型鏈找到 macat.a,而 pineapple.a++ (相當於 pineapple.a = pineapple.a + 1)最終進行的賦值操作創建了 pineapple.a ,故最終這兩個變量的值自然不再相等。
這個例子來看,如果本身即通過對 pineapple 的屬性(a)進行訪問操作,那麼不同情況下訪問得到的結果可能是不同的甚至是出人意料的。無意中創建的屬性“阻止”了原型鏈上查找這個屬性的行為,我們稱之為屬性屏蔽。
屬性屏蔽根據變量本身情況的不同會有很多不同的狀態表現,例如原型鏈上層變量的數據訪問屬性標記為只讀的情況,(如果不是嚴格模式下)嘗試進行的賦值操作會被忽略等。
我們早已知道 JavaScript 中不存在“類”的概念,而為了能夠“寫着爽”,很多開發者都在想盡辦法在 JavaScript 中模仿其它 OO 語言中“類”的行為。其中很常見的做法類似下面這樣:
function Person(name) {
    console.log("I'm " + name + "!");
    this.name = name;
}

Person.prototype.getName = function() {
    return this.name;
}

var chris = new Person("Chris"); // I'm Chris
var sophie = new Person("Sophie"); // I'm Sophie
chris.getName(); // "Chris"
看上去我們的 Person 像極了一個包含 name 成員變量和 getName() 方法的類,並且在其“構造函數”中會輸出 “I’m xxx”。不過在之前的文章中我們已經講過了,並不存在所謂的構造函數,new 只是把 Person() 函數作為構造對象所需調用的函數進行了一次調用而已。不過你可能還會比較奇怪為什麼 .getName() 是可以使用的,既然我們在原型鏈這一章提起這件事,顯然是因為原型鏈,於是回顧之前第二章我們含糊提到的一句話是(之一是)“對這個新對象執行 [[Prototype]] 鏈接”,實際上,這裏我們被 new 出來的對象的 [[Prototype]] 被關聯到了 Person.prototype 上,於是當我們嘗試進行屬性訪問的時候,自然就可以訪問到 Person.prototype.getName() 上了。
不過這個過程還是可能會引起一些蛋疼的誤會,比如假設我們在上面例子的基礎上:
...
sophie.constructor === Person; // true
sophie.constructor === Person.prototype.constructor; // true
Person.prototype = {};
var koishi = new Person("Koishi");  // I'm Koishi
koishi.constructor === Person; // false
koishi.constructor === Object; // true
sophie.constructor === Person; // true
sophie.constructor === Person.prototype.constructor; // false
由於“構造函數”這種表現形式的理解,我們有時候會認為 變量名.constructor 實際就總是構造調用時指向的函數,甚至 sophie.constructor === Person 返回也是 true ,但實際並不是這樣,這裏返回為真,僅僅是因為 Person.prototype.constructor 默認指向的就是 Person 罷了。於是我們嘗試替換 Person.prototype 之後創建了變量 koishi,再檢查 koishi.constructor === Person 就不再為真了,在原型鏈的查找過程最終找到了 Object.prototype,然後 Object.prototype.constructor 其實指向了 Object。
不過,後面我們接着嘗試檢查了 sophie.constructor 卻發現似乎它並未受到影響,這個就不要往原型鏈方面想了,這裏的原因僅僅是 sophie 的原型鏈指向的是曾經 Person.prototype 所指向的東西上,而我們 Person.prototype = {} 的操作只是讓 Person.prototype 指向了新的東西,舊的東西並沒有改變,所以 sophie 自然看上去“沒有受到影響”了。當然,koishi 這個變量被構造時所被調用的函數仍然是 Person(),這和 koishi.constructor 或者 Person.prototype.constructor 的指向沒有什麼關係。
當然我們還有一點需要重新強調的是,[[Prototype]] 和 .prototype 不是一回事,[[Prototype]] 是描述對象實例關係的屬性描述符,而 .prototype 只是 Function 對象的一個屬性而已。new 操作符會把新建的對象的 [[Prototype]] 指向原對象的 .prototype 屬性上,僅此而已。
既然 [[Prototype]] 實際描述了對象之間的實例關係,那麼我們自然就可以想到 instanceof 的實際作用了,其所做的事情就是告訴你在 a instanceof Foo 中, a 的整個原型鏈中是否有指向 Foo.prototype 的對象。
絕大多數瀏覽器支持一個 .__proto__ 屬性(實際位於 Object.__proto__)指向了 [[Prototype]] ,這對於我們調試時希望直接訪問內部的 [[Prototype]] 提供了便利,不過它並不是標準,所以除了調試便利之外還是不要使用它比較好。
於是關於原型鏈相關的簡單討論就到此結束了。和上篇一樣,如果你對這些內容仍然感興趣,不妨去讀一讀《You don’t know JS – this & object prototypes》一書。這是一本開源書,你可以在這裡在線閱讀這本書,或者購買這本書的电子版或實體版。這本書的中文譯本涵蓋在《你所不知道的 JavaScript 上卷》中,你也可以考慮看中文版。
由於近期工作過於繁忙的精力佔用緣故,“原來JS是這樣的”系列可能就暫時告一段落了。最後,儘管我會盡可能仔細的檢查文章內容是否有問題,但也不保證這篇文章中一定不會有錯誤,如果您發現文章哪裡有問題,請在下面留言指正,或通過任何你找得到的方式聯繫我指正。感激不盡~
本站聲明:網站內容來源於博客園,如有侵權,請聯繫我們,我們將及時處理
【其他文章推薦】
※帶您來了解什麼是 USB CONNECTOR ?
※自行創業 缺乏曝光? 下一步"網站設計"幫您第一時間規劃公司的門面形象
※如何讓商品強力曝光呢? 網頁設計公司幫您建置最吸引人的網站,提高曝光率!!
※綠能、環保無空污,成為電動車最新代名詞,目前市場使用率逐漸普及化
※廣告預算用在刀口上,網站設計公司幫您達到更多曝光效益
2019年11月11日08:45:25
從前的日色變得慢
車,馬,郵件都慢
一生只夠愛一個人
中介者模式(mediator pattern),用一个中介對象來封裝一系列的對象交互。中介者使各對象不需要顯式地互相引用,從而使其耦合鬆散,而且可以獨立地改變它們的交互。————《設計模式:可復用面向對象軟件的基礎》
中介者模式是一種對象行為型模式。
從木心這首小詩中的“郵件”中,討論一下中介者模式。
很久很久以前,你和她住在一個很大很大的村子裏面,你住在村的東邊,她住在村的西邊。
那年你才十八,她也正值青春年華,正月十五元宵節,你賞燈之時,她回首處,你一見鍾情。
往後的日子里,你每天都到她家送情書。送了99天,你想這不是辦法,每天大半天浪費在路上,沒時間賺錢。於是你想了一個辦法,創辦郵局,每天替村東邊的人送信件給村西邊的人,一舉兩得。慢慢郵局越來越大,南邊的人通過郵局來給北邊的人送信件,你找了幾個夥計,從南到北,從北到南送信。
多年後,你富甲一方,也娶了當年的她。
“郵局”就是中介者模式中的中介者,“你”和“她”就是中介者中的同事。
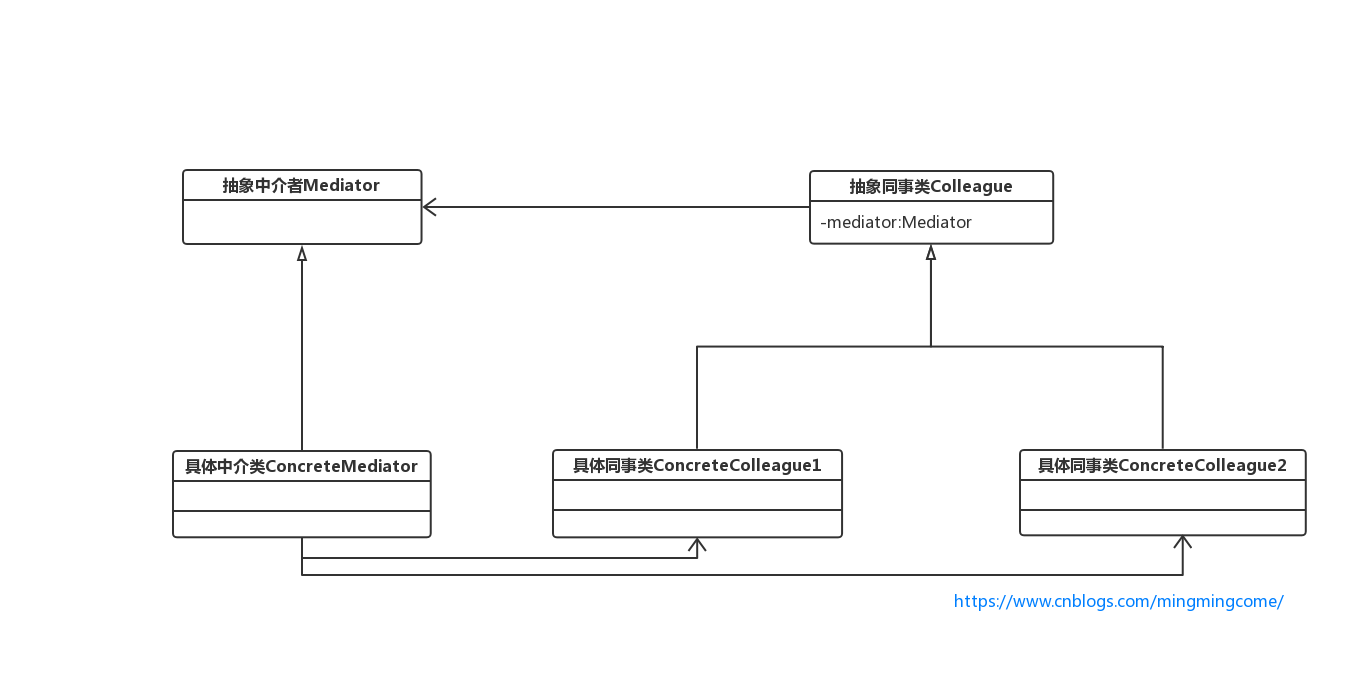
中介者模式結構圖:
從中介者模式結構圖中可知,有以下4個角色:
這是一個悲傷的故事,住在村東邊的你通過郵局給村西邊的她表白,她說,她已經有男朋友了。
類圖:
抽象中介者角色:
public interface PostOffice {
    /**
     * 送信
     */
    void deliverLetters(String letters, String receiver);

    /**
     * 添加收信人
     */
    void addPeople(Villager villager);
}
具體中介者角色:
public class PostOfficeImpl implements PostOffice {
    /**
     * 收信人信息
     */
    private HashMap villagerMap = new HashMap<String, Villager>();

    @Override
    public void addPeople(Villager villager) {
        villagerMap.put(villager.getClass().getSimpleName(), villager);
    }

    @Override
    public void deliverLetters(String letters, String receiver) {
        System.out.println("=>收信:郵局收到要寄的信");
        Villager villager = (Villager) villagerMap.get(receiver);
        System.out.println("=>送信:拿出地址本查詢收信人地址是:" + villager.getAddress() + ",送信");
        System.out.println("=>收信人看信:");
        villager.receiveLetter(letters);
    }
}
抽象同事類角色:
public abstract class Villager {
    protected PostOffice postOffice;
    protected String address;

    Villager(PostOffice postOffice, String address) {
        this.postOffice = postOffice;
        this.address = address;
    }

    public void receiveLetter(String letter) {
        System.out.println(letter);
    }

    public void sendLetter(String letter, String receiver) {
        postOffice.deliverLetters(letter, receiver);
    }

    public String getAddress() {
        return address;
    }
}
具體同事類角色:
// 她
public class She extends Villager {

    She(PostOffice postOffice, String address) {
        super(postOffice, address);
    }
}
// 你
public class You extends Villager {
    public You(PostOffice postOffice, String address) {
        super(postOffice, address);
    }
}
中介者模式測試類:
public class MediatorPatternTest {
    public static void main(String[] args) {
        PostOffice postOffice = new PostOfficeImpl();
        She she = new She(postOffice, "村西邊");
        You you = new You(postOffice, "村東邊");

        postOffice.addPeople(she);
        postOffice.addPeople(you);

        you.sendLetter("正月十五,元宵之夜,一見傾心", "She");
        she.sendLetter("對不起,我已經有男朋友了", "You");
    }
}
測試結果:
村子很大,人很多,關係很複雜:系統中存在很多對象,對象之間存在複雜的引用關係,產生的相互依賴關係結構混亂且難以理解,使得對象無法重用
人與人之間書信交流:對象間存在某種共性交互行為,用中介者封裝這種行為
在這個很大的村子裏面,每個人要給不同人的送信,這種關係成網狀結構,錯綜複雜。
加入郵局中介者之後,成星狀結構,每個人只和郵局有關係。
總結:系統中存在很多對象,對象間存在複雜的關係,在複雜的關係中存在共性交互行為,封裝共性交互行為就是中介者。
中介者模式很容易在系統中應用,也很容易在系統中無用。當系統出現了“多對多”交互複雜的對象群是,不要急於使用中介者模式,而要先反思你的系統在設計上是不是合理。
實例有:聯合國,聊天室等。
中介者模式是應用迪米特法則的典型。
迪米特法則:只與你最直接的朋友交流(Only talk to you immediate friends.)參考
中介者模式,用一个中介對象來封裝一系列的對象交互。中介者使各對象不需要顯式地互相引用,從而使其耦合鬆散,而且可以獨立地改變它們的交互。
2019年11月17日16:32:36
本站聲明:網站內容來源於博客園,如有侵權,請聯繫我們,我們將及時處理
【其他文章推薦】
※為什麼 USB CONNECTOR 是電子產業重要的元件?
※網頁設計一頭霧水??該從何著手呢? 找到專業技術的網頁設計公司,幫您輕鬆架站!
※想要讓你的商品成為最夯、最多人討論的話題?網頁設計公司讓你強力曝光
※想知道最厲害的台北網頁設計公司推薦、台中網頁設計公司推薦專業設計師”嚨底家”!!
目錄
寫這篇博客主要是為了進一步了解如何將CNN當作Encoder結構來使用,同時這篇論文也是必看的論文之一。該論文證明了使用CNN作為特徵抽取結構實現Seq2Seq,可以達到與 RNN 相接近甚至更好的效果,並且CNN的高并行能力能夠大大減少我們的模型訓練時間(本文對原文中不清晰的部分做了梳理,建議與原文搭配服用)
原文鏈接:
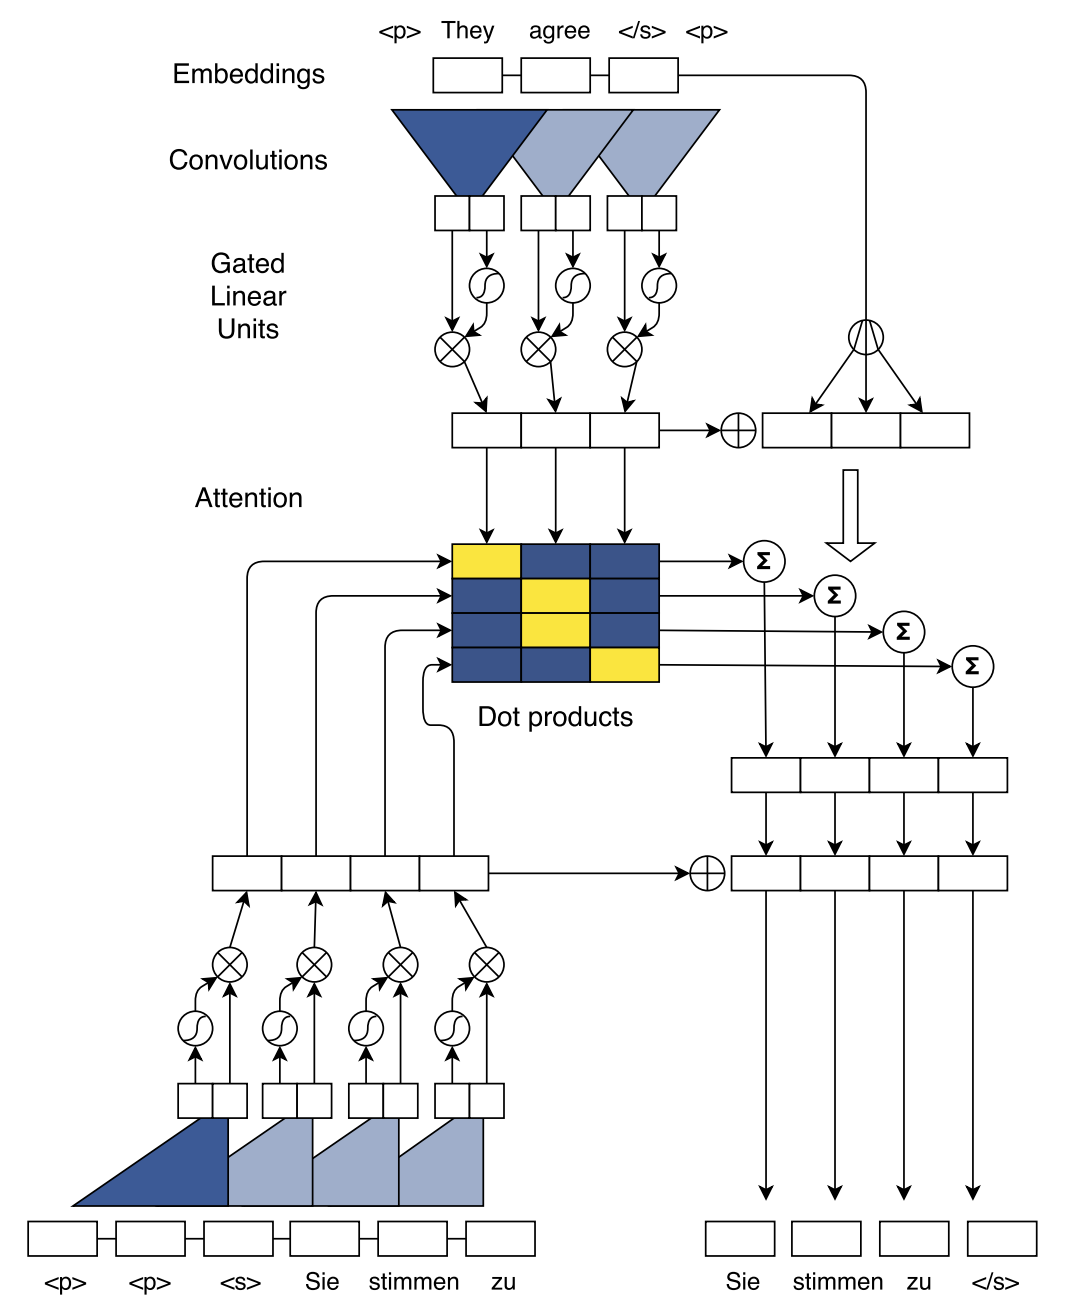
模型結構如下圖所示:
下面對模型的每個部分進行分塊介紹:
卷積網絡和Transformer一樣,不是類似於RNN的時序模型,因此需要加入位置編碼來體現詞與詞之間的位置關係
GLU和GTU是在同一篇論文中提出的,其中,GLU也是CNN Seq2Seq的主要結構。可以直接將其當作激活函數來看待,其將某以卷積核的輸出輸入到兩個結構相同的卷積網絡,令其中一個的輸出為\(A\),另一個為\(B\)。
GLU與GRU的區別就在於A輸出的激活函數不同:
\[GLU:H_0=A \otimes \sigma (B)\]
\[GTU:H_0=tanh(A) \otimes \sigma (B)\]
而CNN Seq2Seq就採用了GLU作為模型的激活函數
原文鏈接:
編碼器與解碼器都是由多個卷積層構成的(原文中稱為block,實際上就是layer),每一層包含一個1維卷積核以及一個門控線性單元(Gated linear units, GLU)。假設單詞數即輸入長度為\(m\),kernel大小為\(k\),pad為\(p\),那麼計算輸出sequence長度的公式為\((m+2p-k)/stride+1\),只要適當的設置卷積核的kernel大小、pad以及步長參數,即可使得輸出序列與輸入序列的維度保持一致。在文中,輸入為25,kernel為5,則輸出序列長度為\((25+2*2-5)/1+1=25\)。
另外,為了充分讓輸出節點跟整個sequence單詞有聯繫,必須使用多個卷積層,這樣才能使得最後一個卷積核有足夠大得感受野以感受整個句子的特徵,同時也能捕捉局部句子的特徵。
來看一下整個編碼器的前向傳播方式:
這樣的卷積策略保證了每一層的輸入與輸出序列的一一對應,並且能夠將其看作簡單的編碼器單元,多層堆疊以實現更深層次的編碼。
對於Attention的計算,關鍵就是找到 Query、Key 和 Value。下圖為計算Attention且解碼的示意圖
Attention的計算過程如下:
Query由decoder的最後一個卷積層的輸出\(h_i^l\)以及上一時刻decoder最終的生成的目標\(g_i\)共同決定,\(W^l_d\)與\(b_d^l\)為線性映射的參數。
\[d_i^l = W^l_dh^l_i+b_d^l+g_i\]
Key 則採用 Encoder 的輸出\(z_j^u\),典型的二維匹配模型,將 Query 與 Key 一一對齊,計算 dot attention分數:
\[a_{ij}^l = \frac{exp(d^l_i \cdot z^u_j)}{\sum_{t=1}^mexp(z_j^u+e_j)}\]
Value 的值則取編碼器的輸出\(z_j^u\)以及詞向量表徵\(e_j\)之和,目的是為編碼器的輸出加上位置表徵信息。得到對應的 Value 值 \(c_i^l\) 之後,直接與當前時刻的 Decoder 輸出 \(h_i^l\) 相加,再輸入分類器進行分類。
\[c_i^l = \sum_{j=1}^ma_{ij}^l(z_j^u + e_j)\]
模型還通過歸一化策略來保證通過每一層模型的方差變化不會太大,這裏先簡單的記錄一下,具體的操作細節需要回去仔細琢磨代碼。歸一化的主要策略如下:
初始化的目的與歸一化是一致的,即都是為了保證前向與後項傳播的數據方差能夠保持在一個較穩定的水準,模型初始化的策略如下:
最後的實驗部分就不記錄了,有興趣的同學可以去原文里看看。
本站聲明:網站內容來源於博客園,如有侵權,請聯繫我們,我們將及時處理
【其他文章推薦】
※USB CONNECTOR掌控什麼技術要點? 帶您認識其相關發展及效能
※評比前十大台北網頁設計、台北網站設計公司知名案例作品心得分享
※智慧手機時代的來臨,RWD網頁設計已成為網頁設計推薦首選
※評比南投搬家公司費用收費行情懶人包大公開
用於標識一個類為配置類,與xml配置效果類似
public class TestApplication {

    public static void main(String args[]) {
        AnnotationConfigApplicationContext ac = new AnnotationConfigApplicationContext(AppConfig.class);

    }
}

@Configuration
public class AppConfig {

    @Bean
    public A a(){
        return new A();
    }
    @Bean
    public B b(){
        return new B();
    }
}


public class A {

    public A(){
        System.out.println("Call A constructor");
    }
}


public class B {

    public B(){
        System.out.println("Call B constructor");
    }
}
上面的例子應該是@Configuration最普遍一種使用場景了,在@Configuration class下面配置@Bean method,用於想Spring Ioc容器注入bean.但其實我們把AppConfig的@Configuration註解去掉,對應的Bean也是可以被注入到容器中去的。
我們給AppConfig改寫一下,如下:
@Configuration
@EnableAspectJAutoProxy
public class AppConfig {

   @Bean
   public A a(){
      b();
      return new A();
   }
   @Bean
   public B b(){
      return new B();
   }
再去執行TestApplication#main,那麼執行結果會是什麼樣呢?
Call A constructor
Call B constructor嗯哼?按照Java的語法,B的構造函數應該是被調用了兩次啊?為什麼只有輸出一句Call B constructor?
這其實就是@Configuration再發揮作用啦,不信你去掉@Configuration,再去運行一下,就會發現B的構造函數被執行了兩次。
官方給出了這樣一段解釋對於被@Configuration註解的類
In common scenarios,@Beanmethods are to be declared within@Configurationclasses, ensuring that “full” mode is always used and that cross-method references therefore get redirected to the container’s lifecycle management.
在一般情況下,@Bean method 是被聲明在@Configuration類中的,以確保 full mode總是被使用,並且跨方法的引用會被重定向到容器生命周期管理。
原來Spring將被@Configuration註解的配置類定義為full configuration, 而將沒有被@Configuration註解的配置類定義為lite configuration。full configuration能重定向從跨方法的引用,從而保證上述代碼中的b bean是一個單例.
public AnnotationConfigApplicationContext(Class<?>... componentClasses) {
   /**
    * 調用無參構造函數,實例化AnnotatedBeanDefinitionReader和ClassPathBeanDefinitionScanner
    * 同時會調用父類GenericApplicationContext無參構造函數實例化一個關鍵的工廠DefaultListableBeanFactory
    * 同時還會註冊一些開天闢地的後置處理器到beanDefinitionMap,這些後置處理器有bean工廠後置處理器;有bean後置處理器
    */
   this();
   //將componentClasses註冊到beanDefinitionMap集合中去
   register(componentClasses);

   refresh();
}
跟蹤refresh()
@Override
public void refresh() throws BeansException, IllegalStateException {
   synchronized (this.startupShutdownMonitor) {
      // Prepare this context for refreshing.
      prepareRefresh();

      // Tell the subclass to refresh the internal bean factory.
      ConfigurableListableBeanFactory beanFactory = obtainFreshBeanFactory();

      // Prepare the bean factory for use in this context.
      prepareBeanFactory(beanFactory);

      try {
         // Allows post-processing of the bean factory in context subclasses.
         //供上下文(Context)子類繼承,允許在這裏後置處理bean factory
         postProcessBeanFactory(beanFactory);

         // Invoke factory processors registered as beans in the context.
         //按順序調用BeanFactoryPostProcessor,這裏的按順序僅實現了PriorityOrdered和Ordered的語意,未實現@Order註解的語意
         //通過調用ConfigurationConfigPostProcessor#postProcessBeanDefinitionRegistry
         //解析@Configuration配置類,將自定義的BeanFactoryPostProcessor、BeanPostProcessor註冊到beanDefinitionMap
         //接着實例化所有(包括開天闢地)的BeanFactoryPostProcessor,然後再調用BeanFactoryPostProcessor#postProcessBeanFactory
         invokeBeanFactoryPostProcessors(beanFactory);

         // Register bean processors that intercept bean creation.
         //按順序將BeanPostProcessor實例化成bean並註冊到beanFactory的beanPostProcessors,
         //這裏的按順序僅實現了PriorityOrdered和Ordered的語意,未實現@Order註解的語意
         //因為BeanPostProcessor要在普通bean初始化()前後被調用,所以需要提前完成實例化並註冊到beanFactory的beanPostProcessors
         registerBeanPostProcessors(beanFactory);

         // Initialize message source for this context.
         //註冊國際化相關的Bean
         initMessageSource();

         // Initialize event multicaster for this context.
         //為上下文註冊應用事件廣播器(用於ApplicationEvent的廣播),如果有自定義則使用自定義的,如果沒有則內部實例化一個
         initApplicationEventMulticaster();

         // Initialize other special beans in specific context subclasses.
         onRefresh();

         // Check for listener beans and register them.
         //註冊所有(靜態、動態)的listener,並廣播earlyApplicationEvents
         registerListeners();

         // Instantiate all remaining (non-lazy-init) singletons.
         //實例化用戶自定義的普通單例Bean(非開天闢地的、非後置處理器)
         finishBeanFactoryInitialization(beanFactory);

         // Last step: publish corresponding event.
         finishRefresh();
      }

      catch (BeansException ex) {
         if (logger.isWarnEnabled()) {
            logger.warn("Exception encountered during context initialization - " +
                  "cancelling refresh attempt: " + ex);
         }

         // Destroy already created singletons to avoid dangling resources.
         destroyBeans();

         // Reset 'active' flag.
         cancelRefresh(ex);

         // Propagate exception to caller.
         throw ex;
      }

      finally {
         // Reset common introspection caches in Spring's core, since we
         // might not ever need metadata for singleton beans anymore...
         resetCommonCaches();
      }
   }
}
跟蹤invokeBeanFactoryPostProcessors(beanFactory)
protected void invokeBeanFactoryPostProcessors(ConfigurableListableBeanFactory beanFactory) {
   PostProcessorRegistrationDelegate.invokeBeanFactoryPostProcessors(beanFactory, getBeanFactoryPostProcessors());

   // Detect a LoadTimeWeaver and prepare for weaving, if found in the meantime
   // (e.g. through an @Bean method registered by ConfigurationClassPostProcessor)
   if (beanFactory.getTempClassLoader() == null && beanFactory.containsBean(LOAD_TIME_WEAVER_BEAN_NAME)) {
      beanFactory.addBeanPostProcessor(new LoadTimeWeaverAwareProcessor(beanFactory));
      beanFactory.setTempClassLoader(new ContextTypeMatchClassLoader(beanFactory.getBeanClassLoader()));
   }
}
跟蹤invokeBeanFactoryPostProcessors(beanFactory, getBeanFactoryPostProcessors());
public static void invokeBeanFactoryPostProcessors(
            ConfigurableListableBeanFactory beanFactory, List<BeanFactoryPostProcessor> beanFactoryPostProcessors) {

        // Invoke BeanDefinitionRegistryPostProcessors first, if any.
        Set<String> processedBeans = new HashSet<>();

        if (beanFactory instanceof BeanDefinitionRegistry) {
            BeanDefinitionRegistry registry = (BeanDefinitionRegistry) beanFactory;
            List<BeanFactoryPostProcessor> regularPostProcessors = new ArrayList<>();
            List<BeanDefinitionRegistryPostProcessor> registryProcessors = new ArrayList<>();

            for (BeanFactoryPostProcessor postProcessor : beanFactoryPostProcessors) {
                if (postProcessor instanceof BeanDefinitionRegistryPostProcessor) {
                    BeanDefinitionRegistryPostProcessor registryProcessor =
                            (BeanDefinitionRegistryPostProcessor) postProcessor;
                    registryProcessor.postProcessBeanDefinitionRegistry(registry);
                    registryProcessors.add(registryProcessor);
                }
                else {
                    regularPostProcessors.add(postProcessor);
                }
            }

            // Do not initialize FactoryBeans here: We need to leave all regular beans
            // uninitialized to let the bean factory post-processors apply to them!
            // Separate between BeanDefinitionRegistryPostProcessors that implement
            // PriorityOrdered, Ordered, and the rest.
            List<BeanDefinitionRegistryPostProcessor> currentRegistryProcessors = new ArrayList<>();

            // First, invoke the BeanDefinitionRegistryPostProcessors that implement PriorityOrdered.
            String[] postProcessorNames =
                    beanFactory.getBeanNamesForType(BeanDefinitionRegistryPostProcessor.class, true, false);
            for (String ppName : postProcessorNames) {
                if (beanFactory.isTypeMatch(ppName, PriorityOrdered.class)) {
                    currentRegistryProcessors.add(beanFactory.getBean(ppName, BeanDefinitionRegistryPostProcessor.class));
                    processedBeans.add(ppName);
                }
            }
            sortPostProcessors(currentRegistryProcessors, beanFactory);
            registryProcessors.addAll(currentRegistryProcessors);
            //此處調用ConfigurationClassPostProcessor#postProcessBeanDefinitionRegistry,
            //解析配置類,為配置中的bean定義生成對應beanDefinition,並注入到registry的beanDefinitionMap
            invokeBeanDefinitionRegistryPostProcessors(currentRegistryProcessors, registry);
            currentRegistryProcessors.clear();

            // Next, invoke the BeanDefinitionRegistryPostProcessors that implement Ordered.
            postProcessorNames = beanFactory.getBeanNamesForType(BeanDefinitionRegistryPostProcessor.class, true, false);
            for (String ppName : postProcessorNames) {
                if (!processedBeans.contains(ppName) && beanFactory.isTypeMatch(ppName, Ordered.class)) {
                    currentRegistryProcessors.add(beanFactory.getBean(ppName, BeanDefinitionRegistryPostProcessor.class));
                    processedBeans.add(ppName);
                }
            }
            sortPostProcessors(currentRegistryProcessors, beanFactory);
            registryProcessors.addAll(currentRegistryProcessors);
            invokeBeanDefinitionRegistryPostProcessors(currentRegistryProcessors, registry);
            currentRegistryProcessors.clear();

            // Finally, invoke all other BeanDefinitionRegistryPostProcessors until no further ones appear.
            boolean reiterate = true;
            while (reiterate) {
                reiterate = false;
                postProcessorNames = beanFactory.getBeanNamesForType(BeanDefinitionRegistryPostProcessor.class, true, false);
                for (String ppName : postProcessorNames) {
                    if (!processedBeans.contains(ppName)) {
                        currentRegistryProcessors.add(beanFactory.getBean(ppName, BeanDefinitionRegistryPostProcessor.class));
                        processedBeans.add(ppName);
                        reiterate = true;
                    }
                }
                sortPostProcessors(currentRegistryProcessors, beanFactory);
                registryProcessors.addAll(currentRegistryProcessors);
                invokeBeanDefinitionRegistryPostProcessors(currentRegistryProcessors, registry);
                currentRegistryProcessors.clear();
            }

            // Now, invoke the postProcessBeanFactory callback of all processors handled so far.
            //調用ConfigurationClassPostProcessor#postProcessBeanFactory增強配置類(通過cglib生成增強類,load到jvm內存,
            //設置beanDefinition的beanClass為增強類)
            //為什麼要增強配置類?主要是為了讓@Bean生成的bean是單例,
            invokeBeanFactoryPostProcessors(registryProcessors, beanFactory);
            invokeBeanFactoryPostProcessors(regularPostProcessors, beanFactory);
        }

        else {
            // Invoke factory processors registered with the context instance.
            invokeBeanFactoryPostProcessors(beanFactoryPostProcessors, beanFactory);
        }

        // Do not initialize FactoryBeans here: We need to leave all regular beans
        // uninitialized to let the bean factory post-processors apply to them!
        String[] postProcessorNames =
                beanFactory.getBeanNamesForType(BeanFactoryPostProcessor.class, true, false);

        // Separate between BeanFactoryPostProcessors that implement PriorityOrdered,
        // Ordered, and the rest.
        List<BeanFactoryPostProcessor> priorityOrderedPostProcessors = new ArrayList<>();
        List<String> orderedPostProcessorNames = new ArrayList<>();
        List<String> nonOrderedPostProcessorNames = new ArrayList<>();
        for (String ppName : postProcessorNames) {
            if (processedBeans.contains(ppName)) {
                // skip - already processed in first phase above
            }
            else if (beanFactory.isTypeMatch(ppName, PriorityOrdered.class)) {
                priorityOrderedPostProcessors.add(beanFactory.getBean(ppName, BeanFactoryPostProcessor.class));
            }
            else if (beanFactory.isTypeMatch(ppName, Ordered.class)) {
                orderedPostProcessorNames.add(ppName);
            }
            else {
                nonOrderedPostProcessorNames.add(ppName);
            }
        }

        // First, invoke the BeanFactoryPostProcessors that implement PriorityOrdered.
        sortPostProcessors(priorityOrderedPostProcessors, beanFactory);
        invokeBeanFactoryPostProcessors(priorityOrderedPostProcessors, beanFactory);

        // Next, invoke the BeanFactoryPostProcessors that implement Ordered.
        List<BeanFactoryPostProcessor> orderedPostProcessors = new ArrayList<>(orderedPostProcessorNames.size());
        for (String postProcessorName : orderedPostProcessorNames) {
            orderedPostProcessors.add(beanFactory.getBean(postProcessorName, BeanFactoryPostProcessor.class));
        }
        sortPostProcessors(orderedPostProcessors, beanFactory);
        invokeBeanFactoryPostProcessors(orderedPostProcessors, beanFactory);

        // Finally, invoke all other BeanFactoryPostProcessors.
        List<BeanFactoryPostProcessor> nonOrderedPostProcessors = new ArrayList<>(nonOrderedPostProcessorNames.size());
        for (String postProcessorName : nonOrderedPostProcessorNames) {
            nonOrderedPostProcessors.add(beanFactory.getBean(postProcessorName, BeanFactoryPostProcessor.class));
        }
        invokeBeanFactoryPostProcessors(nonOrderedPostProcessors, beanFactory);

        // Clear cached merged bean definitions since the post-processors might have
        // modified the original metadata, e.g. replacing placeholders in values...
        beanFactory.clearMetadataCache();
    }
跟蹤invokeBeanFactoryPostProcessors(registryProcessors, beanFactory);
private static void invokeBeanFactoryPostProcessors(
      Collection<? extends BeanFactoryPostProcessor> postProcessors, ConfigurableListableBeanFactory beanFactory) {

   for (BeanFactoryPostProcessor postProcessor : postProcessors) {
      postProcessor.postProcessBeanFactory(beanFactory);
   }
}
跟蹤ConfigurationClassPostProcessor#postProcessBeanFactory
@Override
public void postProcessBeanFactory(ConfigurableListableBeanFactory beanFactory) {
   int factoryId = System.identityHashCode(beanFactory);
   if (this.factoriesPostProcessed.contains(factoryId)) {
      throw new IllegalStateException(
            "postProcessBeanFactory already called on this post-processor against " + beanFactory);
   }
   this.factoriesPostProcessed.add(factoryId);
   if (!this.registriesPostProcessed.contains(factoryId)) {
      // BeanDefinitionRegistryPostProcessor hook apparently not supported...
      // Simply call processConfigurationClasses lazily at this point then.
      processConfigBeanDefinitions((BeanDefinitionRegistry) beanFactory);
   }
   //為@Configuration註解的類生成增強類(如果有必要),並替換bd中的beanClass屬性,
   enhanceConfigurationClasses(beanFactory);
   beanFactory.addBeanPostProcessor(new ImportAwareBeanPostProcessor(beanFactory));
}
到了這一步謎底幾乎已經揭曉了,@Configuration class是通過增強來實現它的語義的。通過增強把跨方法的引用調用重定向到Spring生命周期管理.我們近一步探索下這個enhanceConfigurationClasses方法
public void enhanceConfigurationClasses(ConfigurableListableBeanFactory beanFactory) {
   Map<String, AbstractBeanDefinition> configBeanDefs = new LinkedHashMap<>();
   for (String beanName : beanFactory.getBeanDefinitionNames()) {
      BeanDefinition beanDef = beanFactory.getBeanDefinition(beanName);
      Object configClassAttr = beanDef.getAttribute(ConfigurationClassUtils.CONFIGURATION_CLASS_ATTRIBUTE);
      MethodMetadata methodMetadata = null;
      if (beanDef instanceof AnnotatedBeanDefinition) {
         methodMetadata = ((AnnotatedBeanDefinition) beanDef).getFactoryMethodMetadata();
      }
      if ((configClassAttr != null || methodMetadata != null) && beanDef instanceof AbstractBeanDefinition) {
         // Configuration class (full or lite) or a configuration-derived @Bean method
         // -> resolve bean class at this point...
         AbstractBeanDefinition abd = (AbstractBeanDefinition) beanDef;
         if (!abd.hasBeanClass()) {
            try {
               abd.resolveBeanClass(this.beanClassLoader);
            }
            catch (Throwable ex) {
               throw new IllegalStateException(
                     "Cannot load configuration class: " + beanDef.getBeanClassName(), ex);
            }
         }
      }
      //在ConfigurationClassUtils.checkConfigurationClassCandidate方法中會標記Configuration is full or lite
      if (ConfigurationClassUtils.CONFIGURATION_CLASS_FULL.equals(configClassAttr)) {
         if (!(beanDef instanceof AbstractBeanDefinition)) {
            throw new BeanDefinitionStoreException("Cannot enhance @Configuration bean definition '" +
                  beanName + "' since it is not stored in an AbstractBeanDefinition subclass");
         }
         else if (logger.isInfoEnabled() && beanFactory.containsSingleton(beanName)) {
            logger.info("Cannot enhance @Configuration bean definition '" + beanName +
                  "' since its singleton instance has been created too early. The typical cause " +
                  "is a non-static @Bean method with a BeanDefinitionRegistryPostProcessor " +
                  "return type: Consider declaring such methods as 'static'.");
         }
         configBeanDefs.put(beanName, (AbstractBeanDefinition) beanDef);
      }
   }
   if (configBeanDefs.isEmpty()) {
      // nothing to enhance -> return immediately
      return;
   }

   ConfigurationClassEnhancer enhancer = new ConfigurationClassEnhancer();
   for (Map.Entry<String, AbstractBeanDefinition> entry : configBeanDefs.entrySet()) {
      AbstractBeanDefinition beanDef = entry.getValue();
      // If a @Configuration class gets proxied, always proxy the target class
      beanDef.setAttribute(AutoProxyUtils.PRESERVE_TARGET_CLASS_ATTRIBUTE, Boolean.TRUE);
      // Set enhanced subclass of the user-specified bean class
      Class<?> configClass = beanDef.getBeanClass();
      //為@Configuration註解的類生成增強類
      Class<?> enhancedClass = enhancer.enhance(configClass, this.beanClassLoader);
      if (configClass != enhancedClass) {
         if (logger.isTraceEnabled()) {
            logger.trace(String.format("Replacing bean definition '%s' existing class '%s' with " +
                  "enhanced class '%s'", entry.getKey(), configClass.getName(), enhancedClass.getName()));
         }
         beanDef.setBeanClass(enhancedClass);
      }
   }
}看到有那麼一句話Class<?> enhancedClass = enhancer.enhance(configClass, this.beanClassLoader);
很明顯了,使用cglib技術為config class生成一個enhancedClass,再通過beanDef.setBeanClass(enhancedClass);修改beanDefinition的BeanClass屬性,在bean實例化階段,會利用反射技術將beanClass屬性對應的類實例化出來,所以最終實例化出來的@Configuration bean是一個代理類的實例。這裏稍微提一下為什麼要使用cglib,而不是jdk動態代理,主要是因為jdk動態代理是基於接口的,而這裏AppConfig並沒有實現任何接口,所以必須用cglib技術。
被@Configuration 註解的類,是 full configuration class,該類會被增強(通過cglib),從而實現跨方法引用調用被重定向到Spring 生命周期管理,最終保證@Bean method生成的bean是一個單例。
本站聲明:網站內容來源於博客園,如有侵權,請聯繫我們,我們將及時處理
【其他文章推薦】
※台北網頁設計公司這麼多,該如何挑選?? 網頁設計報價省錢懶人包"嚨底家"
※網頁設計公司推薦更多不同的設計風格,搶佔消費者視覺第一線
※想知道購買電動車哪裡補助最多?台中電動車補助資訊懶人包彙整
※南投搬家費用,距離,噸數怎麼算?達人教你簡易估價知識!
“人類的心靈有一種神奇的能力,它能夠感知到別人的虛情假意。如果銷售人員的暗示是一種虛情假意的產物,那麼幾乎刻意肯定的是,這種暗示在客戶心中產生的結果也不會是一種真實的情感。”
——諾瓦爾·霍金斯
前天,銷售同事老吳還說,做銷售一定要講人品,而且做人很重要。我很贊同他的觀點,但我還是對他的觀點做了補充:不單單是銷售要學會做人,我們任何一個崗位、任何一個人都要學會如何做人。崗位是做事層面,做人是做事的根基,無論你是銷售還是程序員、都離不開做人。我在部門裡經常對同事們說,甚至在面試的時候也跟應聘者強調,我們都是全民銷售。因為我們扁平化的開放管理制度,我們任何一個員工都有可能直接面對客戶。作為服務行業的我們,任何一個同事的印象以及專業態度都是我們的招牌。面對客戶就是面對市場,面對市場的員工就是覆蓋了銷售的角色。我們每個人都代表着一個企業,更代表了自己。有些客戶可能因為我們需求做得好,所以給了我更多的機會;也有可能有些客戶因為我們的美工同事洞悉到了客戶的需求而用真誠的設計打動了客戶,贏下了訂單;甚至可能是我們善良、踏實、勤奮的程序員同事感動了客戶,非要跟我們合作不可。這裏都包含着公司的文化和個人的修養。
我過去一直深受着各種流言的毒害,當然,我不會把問題丟給環境,真正的問題在於自己沒有足夠的獨立思考和判斷能力。別人說程序員普遍悶騷,別人說美工都很藝術,還有人說需求就是要有足夠的健談和洞察能力。其實,話有時候並沒有毛病,但我們缺少一個宏觀與高度的視野能力會很容易讓自己“入戲”,也就是會以偏概全。就像同事老吳說銷售考驗做人,如果我弱一點,我真會以為作為程序員的自己就沒那麼需要關注做人層面了,反正自己不用天天面對客戶。這就是我們常說的短見。
我現在的職位寫着是部門經理,不止戰略,在戰術上如架構、設計、開發我都一直在做,還帶着近80號人。我目前的狀態不是因為我踩正了職業規劃路線,或者我有管理的能力。而是我看不過眼和忍受不了之前團隊的低效和散漫,想自己做得有成就一點,有效率一點而已。沒人敢這麼做,而領導敢給我這樣一個機會,那就只有我自己扛起大旗向前沖了。有時候,當自己真覺得環境待不下去了,可能就是自己的機會。我不知道自己有沒有這個能力,但我有一個看清問題本質的視野和敢說敢做勇氣。個人發展的本質並不是職位驅動的,任何一個有能力的人都能有機會上升,不管你是美工、測試、需求還是程序員,就看自己願不願意放開自己思維和勇氣。我很早就已經說過,職位在做事面前都是一文不值。千萬不要被各種所謂的管理晉陞路線和技術大咖晉陞路線給誤導。人生都是問題驅動的,每個人的起點都不一樣,問題也都不一樣。多把視野放在當前問題身上,而不是帶着別人給出的規劃建議去逃避自己當前的問題,這個同事不好,那個老闆不行,這都不是自己想要的,這都是借口。能讓自己過得好,能讓家人過得好才是王道。所以,從這個角度看,無論什麼職位,跑得越高,越是辛苦。認識不了這個本質的,永遠做不了高層。
我們一出生就已經內置了銷售這個職位,我們需要與人打交道,我們需要結交朋友,我們需要面試找工作等等。其實,我們無時無刻在銷售着自己。而真誠就是我們每一個都需要具備的銷售品質。做銷售的門檻很低,可是考驗很大,但前途也無可限量。
本站聲明:網站內容來源於博客園,如有侵權,請聯繫我們,我們將及時處理
【其他文章推薦】
※想知道網站建置、網站改版該如何進行嗎?將由專業工程師為您規劃客製化網頁設計及後台網頁設計
※不管是台北網頁設計公司、台中網頁設計公司,全省皆有專員為您服務
※Google地圖已可更新顯示潭子電動車充電站設置地點!!
目錄
本博客着重介紹MyBatis執行Sql的流程,關於在執行過程中緩存、動態SQl生成等細節不在本博客中體現,相應內容後面再單獨寫博客分析吧。
還是以之前的查詢作為列子:
public class UserDaoTest {

    private SqlSessionFactory sqlSessionFactory;

    @Before
    public void setUp() throws Exception{
        ClassPathResource resource = new ClassPathResource("mybatis-config.xml");
        InputStream inputStream = resource.getInputStream();
        sqlSessionFactory = new SqlSessionFactoryBuilder().build(inputStream);
    }

    @Test
    public void selectUserTest(){
        String id = "{0003CCCA-AEA9-4A1E-A3CC-06D884BA3906}";
        SqlSession sqlSession = sqlSessionFactory.openSession();
        CbondissuerMapper cbondissuerMapper = sqlSession.getMapper(CbondissuerMapper.class);
        Cbondissuer cbondissuer = cbondissuerMapper.selectByPrimaryKey(id);
        System.out.println(cbondissuer);
        sqlSession.close();
    }

}
之前提到拿到sqlSession之後就能進行各種CRUD操作了,所以我們就從sqlSession.getMapper這個方法開始分析,看下整個Sql的執行流程是怎麼樣的。
進入sqlSession.getMapper方法,會發現調的是Configration對象的getMapper方法:
public <T> T getMapper(Class<T> type, SqlSession sqlSession) {
    //mapperRegistry實質上是一個Map,裏面註冊了啟動過程中解析的各種Mapper.xml
    //mapperRegistry的key是接口的全限定名,比如com.csx.demo.spring.boot.dao.SysUserMapper
    //mapperRegistry的Value是MapperProxyFactory,用於生成對應的MapperProxy(動態代理類)
    return mapperRegistry.getMapper(type, sqlSession);
}
進入getMapper方法:
public <T> T getMapper(Class<T> type, SqlSession sqlSession) {
    final MapperProxyFactory<T> mapperProxyFactory = (MapperProxyFactory<T>) knownMappers.get(type);
    //如果配置文件中沒有配置相關Mapper,直接拋異常
    if (mapperProxyFactory == null) {
      throw new BindingException("Type " + type + " is not known to the MapperRegistry.");
    }
    try {
      //關鍵方法
      return mapperProxyFactory.newInstance(sqlSession);
    } catch (Exception e) {
      throw new BindingException("Error getting mapper instance. Cause: " + e, e);
    }
  }
進入MapperProxyFactory的newInstance方法:
public class MapperProxyFactory<T> {

  private final Class<T> mapperInterface;
  private final Map<Method, MapperMethod> methodCache = new ConcurrentHashMap<Method, MapperMethod>();

  public MapperProxyFactory(Class<T> mapperInterface) {
    this.mapperInterface = mapperInterface;
  }

  public Class<T> getMapperInterface() {
    return mapperInterface;
  }

  public Map<Method, MapperMethod> getMethodCache() {
    return methodCache;
  }

  //生成Mapper接口的動態代理類MapperProxy
  @SuppressWarnings("unchecked")
  protected T newInstance(MapperProxy<T> mapperProxy) {
    return (T) Proxy.newProxyInstance(mapperInterface.getClassLoader(), new Class[] { mapperInterface }, mapperProxy);
  }

  public T newInstance(SqlSession sqlSession) {
    final MapperProxy<T> mapperProxy = new MapperProxy<T>(sqlSession, mapperInterface, methodCache);
    return newInstance(mapperProxy);
  }

}
下面是動態代理類MapperProxy,調用Mapper接口的所有方法都會先調用到這個代理類的invoke方法(注意由於Mybatis中的Mapper接口沒有實現類,所以MapperProxy這個代理對象中沒有委託類,也就是說MapperProxy幹了代理類和委託類的事情)。好了下面重點看下invoke方法。
//MapperProxy代理類
public class MapperProxy<T> implements InvocationHandler, Serializable {

  private static final long serialVersionUID = -6424540398559729838L;
  private final SqlSession sqlSession;
  private final Class<T> mapperInterface;
  private final Map<Method, MapperMethod> methodCache;

  public MapperProxy(SqlSession sqlSession, Class<T> mapperInterface, Map<Method, MapperMethod> methodCache) {
    this.sqlSession = sqlSession;
    this.mapperInterface = mapperInterface;
    this.methodCache = methodCache;
  }

  @Override
  public Object invoke(Object proxy, Method method, Object[] args) throws Throwable {
    try {
      if (Object.class.equals(method.getDeclaringClass())) {
        return method.invoke(this, args);
      } else if (isDefaultMethod(method)) {
        return invokeDefaultMethod(proxy, method, args);
      }
    } catch (Throwable t) {
      throw ExceptionUtil.unwrapThrowable(t);
    }
    //獲取MapperMethod,並調用MapperMethod
    final MapperMethod mapperMethod = cachedMapperMethod(method);
    return mapperMethod.execute(sqlSession, args);
  }

  private MapperMethod cachedMapperMethod(Method method) {
    MapperMethod mapperMethod = methodCache.get(method);
    if (mapperMethod == null) {
      mapperMethod = new MapperMethod(mapperInterface, method, sqlSession.getConfiguration());
      methodCache.put(method, mapperMethod);
    }
    return mapperMethod;
  }

  @UsesJava7
  private Object invokeDefaultMethod(Object proxy, Method method, Object[] args)
      throws Throwable {
    final Constructor<MethodHandles.Lookup> constructor = MethodHandles.Lookup.class
        .getDeclaredConstructor(Class.class, int.class);
    if (!constructor.isAccessible()) {
      constructor.setAccessible(true);
    }
    final Class<?> declaringClass = method.getDeclaringClass();
    return constructor
        .newInstance(declaringClass,
            MethodHandles.Lookup.PRIVATE | MethodHandles.Lookup.PROTECTED
                | MethodHandles.Lookup.PACKAGE | MethodHandles.Lookup.PUBLIC)
        .unreflectSpecial(method, declaringClass).bindTo(proxy).invokeWithArguments(args);
  }

  /**
   * Backport of java.lang.reflect.Method#isDefault()
   */
  private boolean isDefaultMethod(Method method) {
    return ((method.getModifiers()
        & (Modifier.ABSTRACT | Modifier.PUBLIC | Modifier.STATIC)) == Modifier.PUBLIC)
        && method.getDeclaringClass().isInterface();
  }
}
所以這邊需要進入MapperMethod的execute方法:
public Object execute(SqlSession sqlSession, Object[] args) {
    Object result;
    //判斷是CRUD那種方法
    switch (command.getType()) {
      case INSERT: {
        Object param = method.convertArgsToSqlCommandParam(args);
        result = rowCountResult(sqlSession.insert(command.getName(), param));
        break;
      }
      case UPDATE: {
        Object param = method.convertArgsToSqlCommandParam(args);
        result = rowCountResult(sqlSession.update(command.getName(), param));
        break;
      }
      case DELETE: {
        Object param = method.convertArgsToSqlCommandParam(args);
        result = rowCountResult(sqlSession.delete(command.getName(), param));
        break;
      }
      case SELECT:
        if (method.returnsVoid() && method.hasResultHandler()) {
          executeWithResultHandler(sqlSession, args);
          result = null;
        } else if (method.returnsMany()) {
          result = executeForMany(sqlSession, args);
        } else if (method.returnsMap()) {
          result = executeForMap(sqlSession, args);
        } else if (method.returnsCursor()) {
          result = executeForCursor(sqlSession, args);
        } else {
          Object param = method.convertArgsToSqlCommandParam(args);
          result = sqlSession.selectOne(command.getName(), param);
        }
        break;
      case FLUSH:
        result = sqlSession.flushStatements();
        break;
      default:
        throw new BindingException("Unknown execution method for: " + command.getName());
    }
    if (result == null && method.getReturnType().isPrimitive() && !method.returnsVoid()) {
      throw new BindingException("Mapper method '" + command.getName()
          + " attempted to return null from a method with a primitive return type (" + method.getReturnType() + ").");
    }
    return result;
  }
然後,通過一層一層的調用,最終會來到doQuery方法, 這兒咱們就隨便找個Excutor看看doQuery方法的實現吧,我這兒選擇了SimpleExecutor:
public <E> List<E> doQuery(MappedStatement ms, Object parameter, RowBounds rowBounds, ResultHandler resultHandler, BoundSql boundSql) throws SQLException {
    Statement stmt = null;
    try {
      Configuration configuration = ms.getConfiguration();
      //內部封裝了ParameterHandler和ResultSetHandler
      StatementHandler handler = configuration.newStatementHandler(wrapper, ms, parameter, rowBounds, resultHandler, boundSql);
      stmt = prepareStatement(handler, ms.getStatementLog());
      //StatementHandler封裝了Statement, 讓 StatementHandler 去處理
      return handler.<E>query(stmt, resultHandler);
    } finally {
      closeStatement(stmt);
    }
  }
接下來,咱們看看StatementHandler 的一個實現類 PreparedStatementHandler(這也是我們最常用的,封裝的是PreparedStatement), 看看它使怎麼去處理的:
public <E> List<E> query(Statement statement, ResultHandler resultHandler) throws SQLException {
     //到此,原形畢露, PreparedStatement, 這個大家都已經滾瓜爛熟了吧
    PreparedStatement ps = (PreparedStatement) statement;
    ps.execute();
    //結果交給了ResultSetHandler 去處理,處理完之後返回給客戶端
    return resultSetHandler.<E> handleResultSets(ps);
  }
到此,整個調用流程結束。
這邊結合獲取SqlSession的流程,做下簡單的總結:
以上是獲得SqlSession的流程,下面總結下本博客中介紹的Sql的執行流程:
Executor組件有兩個直接實現類,分別是BaseExecutor和CachingExecutor。CachingExecutor靜態代理了BaseExecutor。Executor組件封裝了Transction組件,Transction組件中又分裝了Datasource組件。
Executor、StatementHandler 、ParameterHandler、ResultSetHandler,Mybatis的插件會對上面的四個組件進行動態代理。
MapperProxyFactory
MapperProxy
MapperMethod
SqlSession:作為MyBatis工作的主要頂層API,表示和數據庫交互的會話,完成必要數據庫增刪改查功能;
Executor:MyBatis執行器,是MyBatis 調度的核心,負責SQL語句的生成和查詢緩存的維護;
StatementHandler 封裝了JDBC Statement操作,負責對JDBC statement 的操作,如設置參數、將Statement結果集轉換成List集合。
ParameterHandler 負責對用戶傳遞的參數轉換成JDBC Statement 所需要的參數,
ResultSetHandler 負責將JDBC返回的ResultSet結果集對象轉換成List類型的集合;
TypeHandler 負責java數據類型和jdbc數據類型之間的映射和轉換
MappedStatement MappedStatement維護了一條<select|update|delete|insert>節點的封裝,
SqlSource 負責根據用戶傳遞的parameterObject,動態地生成SQL語句,將信息封裝到BoundSql對象中,並返回
BoundSql 表示動態生成的SQL語句以及相應的參數信息
Configuration MyBatis所有的配置信息都維持在Configuration對象之中。
本站聲明:網站內容來源於博客園,如有侵權,請聯繫我們,我們將及時處理
【其他文章推薦】
※網頁設計公司推薦更多不同的設計風格,搶佔消費者視覺第一線
※廣告預算用在刀口上,網站設計公司幫您達到更多曝光效益
※自行創業 缺乏曝光? 下一步"網站設計"幫您第一時間規劃公司的門面形象
※南投搬家前需注意的眉眉角角,別等搬了再說!